For this first Sounds et al blog, we’re going to describe, step-by-step, how a vinyl record is made – running through the process of manufacturing a finished record, ready to be played…or sold.
Any feedback, questions or comments, get in touch through the links below or email us
So let’s assume at this point that the song, album, or sound, has been recorded, mixed and mastered, and is ready to be cut onto a vinyl record.
This is the process outlined below – the sound is cut onto a lacquer disc, electroplating creates the stamper, and this is used to press the finished record.

Creating the Lacquer Disc
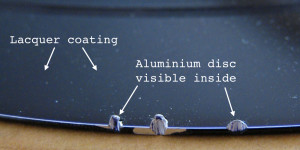
The first step in the manufacturing process is to create the lacquer disc. The manufacturer essentially takes a flat aluminium disc which is then coated with a lacquer vaneer; nitrocellulose lacquer to be precise.
Just imagine a thin metal disc covered in nail polish.
Lacquer disc = done.
Cutting: Recorded Sound onto the Lacquer Disc
The engineer places this blank disc onto a recording machine, AKA a lathe. This machine has a heated sapphire tip (very very pointy), designed to etch grooves into the lacquer surface of the disc.
As the recorded sound plays through the machine, the sapphire tip cuts the recording’s sound waves into the surface of the disc, with a small vacuum sucking up the lacquer that’s being cut out. The recorded sound (however many tracks) will be etched into the disc as one continuous spiral groove – a physical representation of the frequency and amplitude.

***warning*** very rough impression
Once the cutting is complete, the tip is lifted up and the engineer inspects the disc for any flaws. Although the recording has been cut into the disc, the lacquer surface is far too delicate to be played repeatedly.
These lacquer discs, also known as ‘acetates’ or ‘dub plates’, are used to test the transfer of the sound from the original recording onto disc – the sound transfer can be rejected at this point (by engineer/ artist/ label etc), and cutting a new lacquer disc is then required.
Plating: The Stamper
Once approved, the lacquer disc is washed, sprayed with silver solution, and immersed in a tank of tin chloride. Through a process of electroplating, tin molecules are attracted to the silver so that once the disc is removed from the tank, a metal layer has formed on top – an exact opposite image of the lacquer disc.
The metal version (known as the ‘stamper’) is removed from the lacquer disc (now discarded), and will be used as the mold to press the final vinyl records. The lacquer disc was the negative image of the recording (i.e. grooves cut inwards), and the stamper is the positive (i.e. grooves coming outwards).*
You may have also spotted that this has just made a one-sided stamper. The process we’ve covered so far is then repeated step-by-step for the other side, i.e. the B-side.
Pressing: The Finished Vinyl
PVC pellets are melted and shaped into a malleable patty-type lump (imagine a delicious rubbery mini-burger made out of tasty-tasty PVC). This patty is then put in between two separate stampers (the A-side of the recording on one side, B-side on the other), these stampers are hot (~350F) and hydraulic pressure pushes them together, squishing this PVC burger onto the outward facing grooves of the stampers (remember these are the positive image of the sound recording), and pressing the record into existence.
***warning***very rough impression
The edge of this record is then spun against a knife, cutting away the ragged edge. The whole process of pressing and trimming the record takes under 30 seconds.
You now have a finished vinyl record.

Additional Notes
Labels
These are put on during the final pressing stage – both labels (A and B-side) are placed on the record as it’s pressed, and as the PVC cools, the labels are bonded to the vinyl.
Coloured Vinyl
Also determined in the pressing stage – the PVC pellets can be coloured, and mixed to create different tones of the finished record.
Centre Holes
Too much information for the main post…but when making the lacquer discs a hydraulic puncher cuts a hole in the centre for the disc to be held on the lathe and in the tank for electro-plating. When the stamper is separated from the lacquer disc, an engineer puts the metal disc under a microscope which is attached to an optical-cantering punch (seriously), and by rotating the disc the grooves are aligned with a guide in the viewfinder, and a hole is punched in the exact centre.
* Stamper Reproduction
The stamper is also called the ‘father plate’. This father plate (remember, the positive image of the recording) can be plated again to create a ‘mother plate’ (i.e. a negative image of the recording, same as the lacquer disc). Made out of metal, this mother plate is a more durable copy of the lacquer disc, and can be used in the future to create more ‘father plates’.
Disc Protection
Along with various quality control checks (e.g. listening and visibly checking the production stages), the discs will be kept apart from one another with rubber rims around the discs, and central plastic stoppers when they’re stacked – ensuring they don’t rub together, causing flaws.
More Information
If that wasn’t enough and you want more, have a look at these other pages:
• HowStuffWorks – Brief but straightforward description of the process
• The Telegraph – 2 minute video from the pressing plant explaining the process
• Gizmodo – Article with some history of the format, along with a 4.5 minute video with GGR
• Adam-Ant.net – Short but helpful article, with some handy photos too
Want More?

Have a look at another post from Sounds et al –
How Do Vinyl Records Work?